Friday, October 30, 2009

Tweety FOTD: My 2009 Halloween Look

Hi everybody,

Gee, this is the second Halloween since MMB was born. Time flies, doesn’t it? Although I am not really into Halloween, I thought this time of the year is fun to do some wild looks without people thinking I am crazy. Most times, I wear boring neutrals and once in a while, I decide to bust out some bright and loud colors. The look is actually very wearable without the lashes and it reminds me of the post-orgasm post-workout glow. The pair of feathered falsies I picked up from Walmart for 4 bucks also inspires me to do this look.


Feathered Lashes at Walmart (4 bucks!)

When I saw these false lashes, I jumped with joy! They look like the Shu lashes that cost around 50 bucks. I have been dreaming of wearing lashes made out of feathers ever since I saw Karen wearing one. The ones I got are not Shu, but who wears feathered lashes everyday, right? Hence, it is justifiable to spend 4 bucks on these puppies than half a Benjamin on a pair o’ Shu.

Also, I have not been using the NYX ultra pearl mania pigments for a long time and while doing this FOTD, I almost kicked myself for not using them as often. These pigments are very potent and shimmery. “Pearl” actually reminds me of the shell-lacquered pictures my grandparents have back home. These dollar-something pigments give Chanel eye shadows a run for their money. I highly recommend them.


The look

Eyes

 The post-workout glow eye :)

I haven’t done such a multi-step eye look in a long time but this is not so hard to do. You only need a few colors, three brushes and liners.
  • MAC Perky paint pot as base, applied with finger
  • Apply NYX ultra pearl mania in Sky Pink all over the lid with EcoTools eyeshadow brush
  • Apply NYX ultra pearl mania in Fanta on the outer-v and contour to 2/3 of the crease with MAC 217 brush
  • Apply NYX ultra pearl mania in Pearl to the inner corner of the eyelid and underneath the brow bone, using the same MAC 217 brush
  • For the upper lash lines, first curl your eyelashes and then line with black eyeliner
  • For the lower lash lines, apply Wet n Wild Idol Eyes crème shadow pencil in Pixie as a base
  • Then, apply the green color of the Pupa baked eyeshadow duo over the penciled area using a wet slanted EcoTools eyeliner brush
  • To give the illusion of wider eyes, line the outer ½ of the lower lash line with NYC waterproof eyeliner in Teal.


Face: 


 The face, sans false lashes

This is the first time I use my E.L.F powder brush with the wet method to apply my mineral foundation. The result is very fabulous and I will probably use this method more often with this brush.
  • Apply face primer and let it set
  • Then, lightly wet E.L.F powder brush, dip to Adorned with Grace mineral foundation in Grace 3.5, and apply to face with stipple motion
  • Using Physicians Formula blush/bronzer duo in Soft Ginger/Soft Bronzer and MAC 168 contour brush, first apply the blush to the apple of the cheeks, and then contour the whole face with the bronzer
  • To highlight the cheekbones and bridge of the nose, use the same brush and Silk Naturals finishing powder in Date Bate.
Lips: 
I love this lip color, it is very bright! I haven’t used Revlon lipsticks in a very long time and I’m glad that this one is very smooth and moist. It feels a lot like MAC luster lipstick but with better pigmentation.
  • Apply Revlon Super Lustrous lipstick in Soft Silver Rose to the lips, using a lip liner brush.

Now, let the fun begins!

False eyelashes: Feathered lashes- Drama & Glamour ($4 at Walmart)
  • First, trim lashes to fit the eyes and toss away the glue (it does not work!)
  • Using Ardell glue, apply a strip of glue to the backbone of the falsies and wait about 30 seconds for it to get tacky
  • Carefully apply each false lash to the eyes (optional: camwhore between each application.)

 After one false lash
You see how much I enjoyed this :)


With both lashes done


I must have used some really smashing mascara, look at my lashus :)


Hey girls, don't tell the kids where I hide the candies, mkay?
That’s it, you’re done! Get out there and party your lil’ heart out!


Happy Halloween, everybody!
I know, this picture has some "Twilight" quality in it and I don't even dress up as a vampire >:)


A lil’ note: Why I named this FOTD “Tweety”


First of all, it ain’t “Twitter” so forget about me being inspired by the blue tweet bird. Tweety is the little yellow canary in Looney Tunes, remember? I thought the lashes look like hers so I named this look after Tweety, not Big Bird or Twitter bird. Also, please don't anticipate me to dress up as a yellow bird. This is obviously just for fun :)

For those who want some vampire lovin', obviously yours truly was ahead of the game. I dressed up as a vampire for last year's Halloween FOTD, before Twilight became Twilight. Click here if you want to do some vampire makeup this year.


Photobucket

P.S: If you like my blog, please subscribe to my feed. Thanks a lot!

Thursday, October 29, 2009

Gifts from Italy and My New Fringe

Hi everybody,

The best part of having a blog is to interact with people all over the world. Since I've been writing here, some bloggers and I have become good friends via the internet. One of them is Gio from Beautiful with Brains and during one of my posts, she expressed that she wanted to try the products that are not available at her coast. So, we exchanged emails and did a swap. While I'm no longer a rookie blogger (this is my sophomore year, y'all), I rarely swap makeup. However, I jumped at a chance to try some European makeup and Gio furnished me with some really wonderful makeup love.


Gifts from Italy, yay!

As I may not have a chance to find replacements, I have been using them very carefully. The Pupa eye shadows are really gorgeous! I enjoy the pigments from Gosh, Barry M, and Sleek very much. The lipstick from Deborah is very silky and feels a lot like MAC Creamsheen. Art Deco stuff (the black jar and the brown eyeshadow) are tiny but they are also nice.

Gio, thank you so much for being my swap partner! I hope your stuff will arrive soon.

On another note, I got a chance to do my own fringe ("bangs" for the Americans.) As much as I love Aveda Institute, almost every time I go there, my bang got hacked off in some of the most unflattering way. I don't want to blame the student hairdressers but my hair is really straight and without using any products to make it swerve to the right, the cut has to be extremely meticulous. Otherwise, the hair would just hang down straight to my nose.

But when there's a will, there's a way. As I want my bangs look like Nicole Richie's, I also accept the possibility to take matters in my own hands. And I did!


New fringe, y'all!

It took me about half an hour to meticulously snipping away tiny bits of hair and while I don't look like Nicole Richie, my bangs look more decent. It does swerve to the right without me doing anything. If any of you want a tutorial, please let me know. I'll give you some pointers on cutting your own side-sweep bangs.

That's all for today, folks! Have a nice day and give me some comments, ok?

Photobucket

P.S: If you like my blog, please subscribe to my feed. Thanks a lot!

Wednesday, October 28, 2009

Nail Polish Rendez-Vous: Revlon Silver Screen or $$$$$Yes Twin

Hi everybody,

Guess what happened when I started to write this post? I became my own source! Seriously, more than a year ago, I blogged about some MAC LEs and mentioned my love to a nail polish called $$$$$Yes (click here to read.) In that post, I basically said that I loved the shade but hated to spend 11 buckaroos on a bottle of nail polish. And since then, for those who believe in "The Secret", the Universe did work out a way for me to get a bottle of $$$$$Yes (pronounced "Cash Yes") without breaking the bank. I did get the doppelganger and for a while thought it looked familiar. Then, one day while driving, it hit me like a truck that I indeed wore something on my fingers that looks eerily similar to the coveted $$$$$Yes for a lot cheaper! While I proceeded to search for some info on the MAC nail polish, I saw my post ranked number 4 in Google search. So that's how I became my own source and whoever created the phrase "what goes around comes around" was so right. This nail polish came around to me big time, wowza!

Ok, if you survived through my incoherent yapping, you deserve to see what I'm talking about. Let me show you Revlon Silver Screen nail polish, a $$$$$Yest twin:


What do ya say, Cash Yes?


The bottle by itself
Pretty, ya?


Right now, if you try to get yourself a bottle of $$$$$Yes, it will cost you around $18 USD. The last time I saw it was from the Starflash collection and the first time it made a flash was from Heatherette, which sounds like a million years ago. Immediately, I was drawn to this silver metallic nail polish and if the price was cheaper (hovering around 8 dollars), I would have bought it. When I put Silver Screen on my nails, I thought to see this color somewhere before but did not recall where. Once I did (like a truck!), I also found out that Silver Screen has some purple flecks in it. It is very subtle but you can see it in the above picture.


You can also see the purple hue on my thumb nail as well


Pretty, ya?
It was actually a very good day as I did not make a huge mess on my nails.

A bottle of Revlon nail polish costs around $4-5 USD and on the day I bought Silver Screen, there was a BOGO at CVS and I had a $1 off coupon so it costs $2 per bottle for me. The Revlon nail polishes are very pigmented and 1 layer is enough (I went overboard and did 2 layers.) This nail polish did not chip at all during the week I wore it, and I was typing hard during that time, too. This color has some clubby vibe on it and as a silver metallic shade, it is not for the faint of hearts. When you wear it, expect to rock on (or at least feel like you're rocking on while writing your thesis!)

That's all for today, folks! What do ya think about Silver Screen, huh? Gimme some comments, ok?

Photobucket

P.S: If you like my blog, please subscribe to my feed. Thanks a lot!

Tuesday, October 27, 2009

Organize It: Cataloging Your Mineral Pigment Sample Stash

Hi everybody,

Although I am not the neatest person I've known, I believe "a cluttered desk is a cluttered mind." While people embrace their cluttering and call it "creative chaos", I just simply refer my clutter as a mess. Sometimes, I have some sort of classification for my mess, aka "the dump system" or "the pile system", I realize I can only be sane if the mess is temporary. Who can live day to day having to step over junk to get to their desk? Not me, nuh uh!

Having all those said, I have quite a lot of mineral makeup samples gathered around the house. Of course, I had my own system to classify them and it looks like this:

Similar colors are bunched in the same bag

The advantage of this system is it does not take a lot of space to store stuff. However, it does not justify the disadvantage to find stuff when I need them. So, what takes to bring high entropy to this stash?

Y'all, I had to bring in the big gun: the photo album!

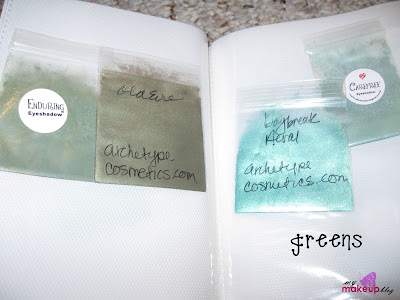
The wonderful part about the photo album is it lets me cataloging all my samples based on whatever classification I prefer. I chose to classify them in groups of colors (highlights, neutrals, golds, blues, greens, etc). It takes a bit of sorting to do and some space to do the sorting as well.

You sort out your samples like so, from dark to light (or light to dark)
That's a part of my purple pigment samples

And here is the result:


Highlighting colors

Golds and browns

Purples

Greens

Blues

Reds and dark colors

Black pigments

While cataloging my pigments, I realized this is very similar to what my nephews have been doing with their baseball and Yugio cards. I prefer to put 2-3 pigment samples per sleeve side, more than that would be difficult to get out. So far, I filled up 120 pages of that album and found out I have an obscene amount of purple pigments. Yet, I rarely use purple at all, what gives?

Of course, you can always get a bigger album to catalog all your samples. It is a fun activity that does not take a lot of time to do. Also, once organized, it will not give you so much troubles to find your pigments in the future.

What do you think? Please give me your comments, ok?

Photobucket

P.S: If you like my blog, please subscribe to my feed. Thanks a lot!

Monday, October 26, 2009

Pencisl, Straight from the Vault!

Happy Monday, everybody!

Next to my unequivocal love to mascara and makeup brushes is my love to pencils, you know, eyeliners and lip liners. I did not know how many of them I've hauled home until I did an inventory and holy mother of pearl, I have a lot! Take a look at my pencil army:


The first 12 are eyeliners while the last 5 are lip liners. Except for the first one, which is MAC Teddy eye kolh, the rest of them are super cheap. #2, 3, 4 are Wet n Wild, #5 is a Revlon liner, #6 is from NYC (great stuff, by the way!)

Liner #7 is the famous Revlon Colorstay pencil that I've had for a while now. I refuse to throw it away even when the mechanical part does not work that well anymore. #8 is also Revlon Colorstay but in liquid pencil form. This one is great and so easy to use. I am going to do a review on it soon. #9 is a Victoria's Secret liquid pencil liner in teal. It is alreayd discontinued a long time ago but the color is really gorgeous.

#10-12 are chubby liners and they work to a certain extend. So far, I've had the worst luck with chubby pencils although I really love them a lot. I really want to try NYX chubby pencils but don't know how well they perform. I hate to spend money on things that do not work that well.

The lip liners are uber cheap: the red one (#13 from the left) is from Rimmel London and is very fabulous to use. I really love Rimmel lip liners as they are soft and pigmented (and cheap, too!) You don't need to spend an arm and a leg on lip liners if you can get your hands on some Rimmel. The next two are from Maybelline NY and I think they are already discontinued. They are the remains of my dark lipstick wearing past and I don't wear them anymore. These liners are really soft and I hate to throw them away.

The tall lip liner (#16) is the famous Wet n Wild 666 lip liner that I love so much! I did a review here and urge all of y'all to go get it. It only costs a whooping amount of cash around the neighborhood of 99 cents!

The last one is NYX lip liner in Natural, I rarely use it as it is quite hard. I prefer the 666 over this one although they cost the same price.


I store them in a jar and this jar is really full for now!

You know what I just did? I just gave you a batch review (or preview) of all my liners. So far, the ones that work for me are either really expensive or really cheap. The exception is Revlon Colorstay, which is the best black liner in the market so far. For lip liners, I do not own anything so expensive and honestly, I do not see the difference between an expensive lip liner and a cheap one. The fact that Wet n Wild 666 is in the most popular lip liner list is the testament to that.

How about you? How many liner pencils you own? Do you have colored eyeliners or just stick to black ones? I'd love to hear from y'all,  so comment, ok?

Guess what? 15 more followers and I'll reach number 100. So those of you who have not followed me yet, you should. The sooner I go over 100, the sooner we'll have another giveaway. Hence, follow up, folks! It does not take you more than 1 minute, I promise.

Photobucket

P.S: If you like my blog, please subscribe to my feed. Thanks a lot!

Sunday, October 25, 2009

A Short Reading List

Hello, folks!

As an effort to support each others blogs, a group of beauty and fashion bloggers (including myself) has formed a reading club called "GILTY Pleasures Weekend Web Tour". By the end of summer, the web tour that I used to join just died down and I missed doing it a lot. I hope you feel the same, too. For its inaugural tour, this list is really short but don't worry, soon there will be more people to join.


Alison of the Advice Sisters offers readers a video interview with makeup artist Gabriel Almodovar for Maybelline Color Sensational Lip Color about how to pick and apply the perfect red lipstick for any and every skin tone -- a must have color for Fall and for the holidays!

Dao from My Makeup Blog found a way to revive your clumpy and dried up mascara and save you some money.

The Informed Makeup Maven gives you the chance to win a L'Oreal Intense Liquid Pencil, tube of Lipocils and Napoleon Perdis must have Camera Finish Foundation.


If you have any questions regarding the blog tour, please contact Allison. I hope you are having a wonderful weekend so far. See you again on Monday!

Photobucket

P.S: If you like my blog, please subscribe to my feed. Thanks a lot!

Friday, October 23, 2009

My New Moon

Hello ladies (and gents),

Recently, I've been in a mood called "A Girl's Gotta Bling" where I constantly crave for some bright and shiny little things. To fuel my crave, Michael's seems to have lots of sales on their crystals and they are quite affordable. I got some pieces and got myself busy. While they all turned out great, I love this piece the most:


I call it "My New Moon"


So pretty, see!


It really sparkles!

I have to say the camera does not do justice to this piece of crystal: it really sparks fiercely. Since I am very new at wire wrapping, it does look wonky. I appreciate any suggestions and tips (Stephanie, help!) For those who are jewelry makers out there, don't worry, I am not edging to your market. While I love beading, I am not that detail oriented as you guys. But once in a while, I do love to make something for myself.

That's all, folks! I hope this week has been good for you. I am working on an important deadline and you may find my blog entries shorter in the future. However, I will try to blog as frequent as I can and appreciate your support.

Photobucket


P.S: If you like my blog, please subscribe to my feed. Thanks a lot!

Thursday, October 22, 2009

Joyous FOTD

Hi everybody,

Starting from last weekend, since the temperature went down a bit, I felt more positive and found myself laughing and smiling for no reason, as if all the burdens and fogginess in my life just vanished. While I tried to be as upbeat and cheerful while I blog, in real life things are a lot messier. Therefore, smiling because I want to smile and laughing because I want to laugh are good things. With cheerful mood comes cheerful makeup and recently, I did a Christmasy  look in October. Come to think of it, I don't wear red lipstick that much in the house, let alone outside. But that day, I decked myself down and man, I felt great!


Joyous FOTD

Eyes


Open eye


Semi closed eye


  • MAC Rubenesque paint pot as eyeshadow base
  • L'Oreal eye pigment applied all over the lid with EcoTools eyeshadow brush. The eye pigment was discontinued a long time ago and I doubt if I can still get it. The color is rustic gold with some olive pigments. MAC Old Gold may be used as a substitute.
  • Dark brown eyeshadow from NYX Perpetual trio on the outer v and to the crease, applied with MAC 217.
  • Gosh eye pigment in Pineapple to the inner corner of the eyes, applied with EcoTools eyeshadow brush. (Thank you, Gio for the pigment!)
  • MAC Warming Trend from Cool Heat LE as highlighter, applied with MAC 217.
  • Revlon ColorStay liquid pen eyeliner to line the lash. I winged it out a bit to get the cat eyes look.
  • 2 coats of L'Oreal Telescopic Explosion mascara to the lashes.
Cheeks
  • Physicians Formula Organic Wear blush and bronzer in Light Bronzer/Light Ginger: Light Ginger was used as a blush and Light Bronzer as a contouring powder. Both shades were applied with MAC 168 brush.
  • For extra shimmer, I applied Adorned with Grace mineral shimmer blush in Glamorous with my favorite StudioTools dual fibre brush.
Lips
  • I lined my lips with Rimmel London Exaggerate automatic lip liner in Red Diva,
  • Then, I applied NYC Retro Red to my lips with a lip liner brush.

 Since it was so cold, I wore a hooded long cardigan and put the hood on


I'm no Little Red Riding Hood, more of Big Black Riding Hood with a zit :)
And why my wink looked so evil?

To me, this look is versatile: you can change the lipstick to something brown or neutral for a daytime look. If you want a more vampy look, just edge on some dark raspberry lipsticks and call it a day (or night!)

What do you think? Give me some feedback, feedback, ok?

One more thing: I didn't realize the new Windows 7 is coming out today. Are you going to upgrade your operation system?


Photobucket

P.S: If you like my blog, please subscribe to my feed. Thanks a lot!