Oopsie this took me so long!! Baked the cake 2 weeks' ago and instagrammed it saying I'll share the recipe soon but err...I took 2 weeks. SORRY!!!!! I'm extremely tired now and I'm blogging from my BKK hotel room.

This is the final product which is SUPER pretty, I LOVE!!!

All ingredients can be purchased from big supermarkets! I got all my stuff from Giant supermarket!
INGREDIENTS
Makes about 20 - 24 jelly hearts.
For the crust :
300g digestive biscuits
150g melted butter
300g digestive biscuits
150g melted butter
For the cheesecake layer :
500g cream cheese (placed in room temperature for 2 to 3 hours to soften)
1 & 1/2 tablespoons gelatin powder
1 & 1/4 cups boiling water
2/3 cups sugar
1 teaspoon vanilla extract
About 10 to 12 strawberries
500g cream cheese (placed in room temperature for 2 to 3 hours to soften)
1 & 1/2 tablespoons gelatin powder
1 & 1/4 cups boiling water
2/3 cups sugar
1 teaspoon vanilla extract
About 10 to 12 strawberries
For the jelly layer :
160g strawberry flavoured jelly
1 & 1/2 cups boiling water
1 & 1/2 cups cold water
160g strawberry flavoured jelly
1 & 1/2 cups boiling water
1 & 1/2 cups cold water

BAKER CHONG LET'S GO!
Steps :

Melt the butter for 30 secs in microwave oven! Remember to use an oven-proof bowl and place a cling wrap above.

This is how it looks after melting. Using a brush, spread a bit of melted butter across the base of a large rectangular pan to avoid the cake layer from sticking to the pan.
Next, grind the digestive biscuits which act as the base for the cake! Ooolala~~ This step is the most tiring step for me! USE A FOOD PROCESSOR IF YOU HAVE ONE! Saves a lot of time and trouble.


Make sure it become fine crumbs!

Stir well to combine! It will start to smell very pleasant already (:


You can use a potato masher or something with a big flat surface to flatten it. Let it sit in the refrigerator after that.
NEXT!!!!!

Add 1 & 1/2 tablespoons of gelatin powder in a bowl. Use the right amount of gelatin, else the cheese layer won’t set.
Add 1 & 1/4 cups of boiling water to the gelatin powder.
Stir well and set aside to cool.
This was where I did wrong. I added too little gelatin cos I thought I was a smartass. It looked too watery at first so I thought I should cut down on the gelatin. In the end my cheese layer was very soft. SEE LA WANT TO ACT SMART ALL, NEXT TIME JUST FOLLOW INSTRUCTIONS ACCORDINGLY!!!!

Mix 500g of cream cheese and 2/3 cups of sugar in a large bowl and combine it with an electric whisk!

Whisk till it's light and fluffy, then add 1 teaspoon of vanilla extract into the cream cheese mixture.
Thereafter, pour in your cooled gelatin mixture slowly and whisk well to combine.

The finished mixture should be runny like a milkshake!
Now it's time to take out the pan from the fridge. Using a fork, poke holes all over the biscuit base.


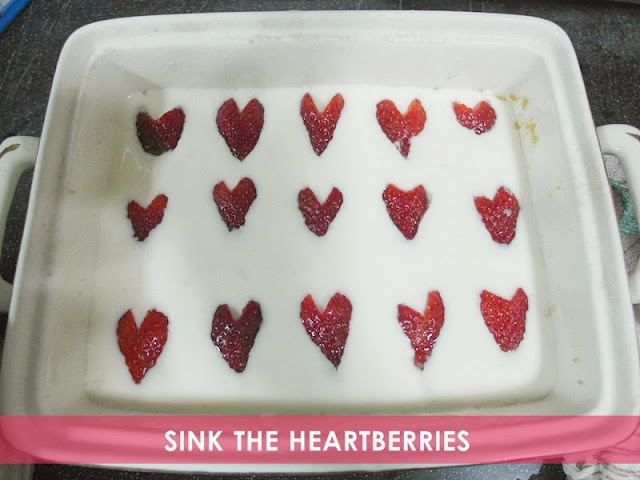
In the meantime, cut the strawberries. Cut them first in half. Look for the thicker side and cut lengthwise across it so that each strawberry heart is thick. Then at the top of the strawberries, slice off the white tops with the leaves and cut a deep V in the centre.


Press each strawbie half into the cream cheese mixture. Make sure it's partially sunken in so it won't float out of the jelly surface later.
Space the strawbies 1" - 1.5" apart.
Once you're done, cling wrap the pan and place it in the fridge to chill for at least 4 hours or overnight. Take it out after that and make the jelly layer!


For me, I used Tortally jelly cos I always make this and it's super easy! Just gotta mix the powder with 500ml of hot water then 500ml of cold water once it's fully dissolved. Let the jelly cool down for awhile.
Gently pour in the jelly mixture into the pan slowly on top of the cream cheese mixture.
Cling wrap it and chill for another 4 hours.
TADAH...................................


It was a partial success. Everything went well except for the mistake I made in adding too little gelatin to harden and hold the cheesecake layer. If you follow the instructions carefully, you should be able to get an ideal strawbie hearts cheesecake. It's relatively easy to do, just very time-consuming.
I had fun making these cute little babies, and had even more fun eating them.
Do try it out and let me know how it went!
Recipe credits to : Story Of Bing
XX
Sophia
0 comments:
Post a Comment